Compress a PDF to an exact size: 100KB, 200KB, 500KB, 1MB
Last updated: 8 November 2026.
Pick the limit your form asks for, then compress toward exactly that number — not a quality guess. The exact-target compressor takes a size in kilobytes and works toward it in three steps, then reports the size it reached and whether the target was met. Start with the portal's own limit: 200 KB for most exam forms, 500 KB or 1 MB for documents, 100 KB only for small photos. If the file cannot reach the target and stay readable, you get the closest readable result instead of a silent overshoot.
Why exact, and why the level matters
Portals set a hard cap, and a file over the cap is rejected outright — there is no close enough. A photo that is 210 KB fails a 200 KB limit exactly as surely as a 2 MB photo does, and a file squeezed to 150 KB when 200 KB was allowed has lost quality for nothing. That is why the target matters more than the method: the job is to land on the number the form asks for, keeping the file readable, and to know the size you actually reached before you upload it.
The four levels in this guide cover nearly every portal limit you will meet. Exam and job forms cluster around 200 KB for photos; document uploads cluster around 500 KB and 1 MB; a few photo caps go as low as 100 KB. They are not four different jobs — they are one job with four targets — so this guide treats them as sections of a single method, and the tool takes whichever target you type in.
How to compress a PDF to an exact size
The method is the same at every level: choose the file, set the target, compress, and read the result. The only thing that changes is the number you type. Do not start by guessing a quality setting — start by reading the limit on the form, because a wrong target wastes the whole attempt: compress to 100 KB when 1 MB was allowed and you have thrown away detail for nothing; compress to 1 MB when 200 KB was the cap and the upload is rejected.
If you are unsure which level your form wants, check the form itself before you compress: the limit is usually printed next to the upload button, in the instructions, or in the confirmation email. The Compress PDF tool also carries a table of common portal limits with the dates they were verified, so you can tap a limit and use it as your target instead of typing the number yourself.
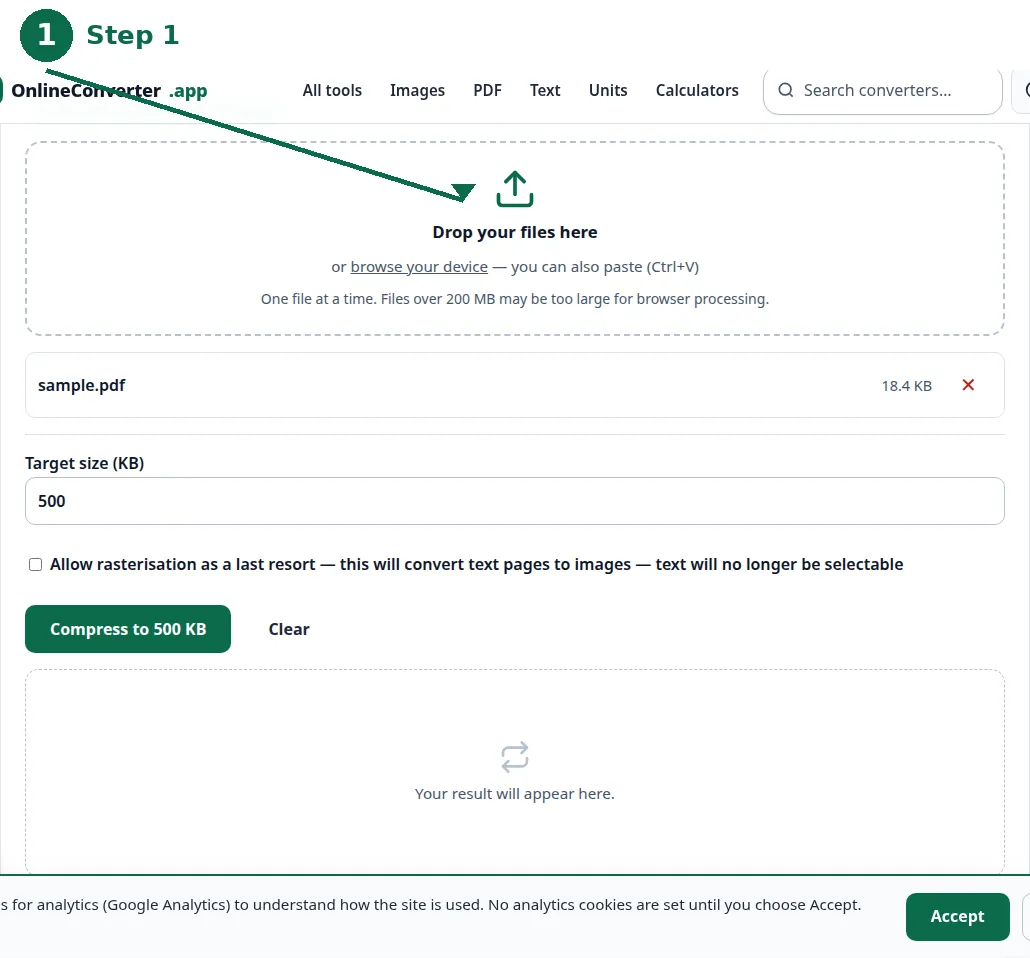
- Step 1 — Open the Compress PDF tool and choose your PDF file.
- Step 2 — Type the target size in kilobytes: 100, 200, 500 or 1000, matching the limit on your form.
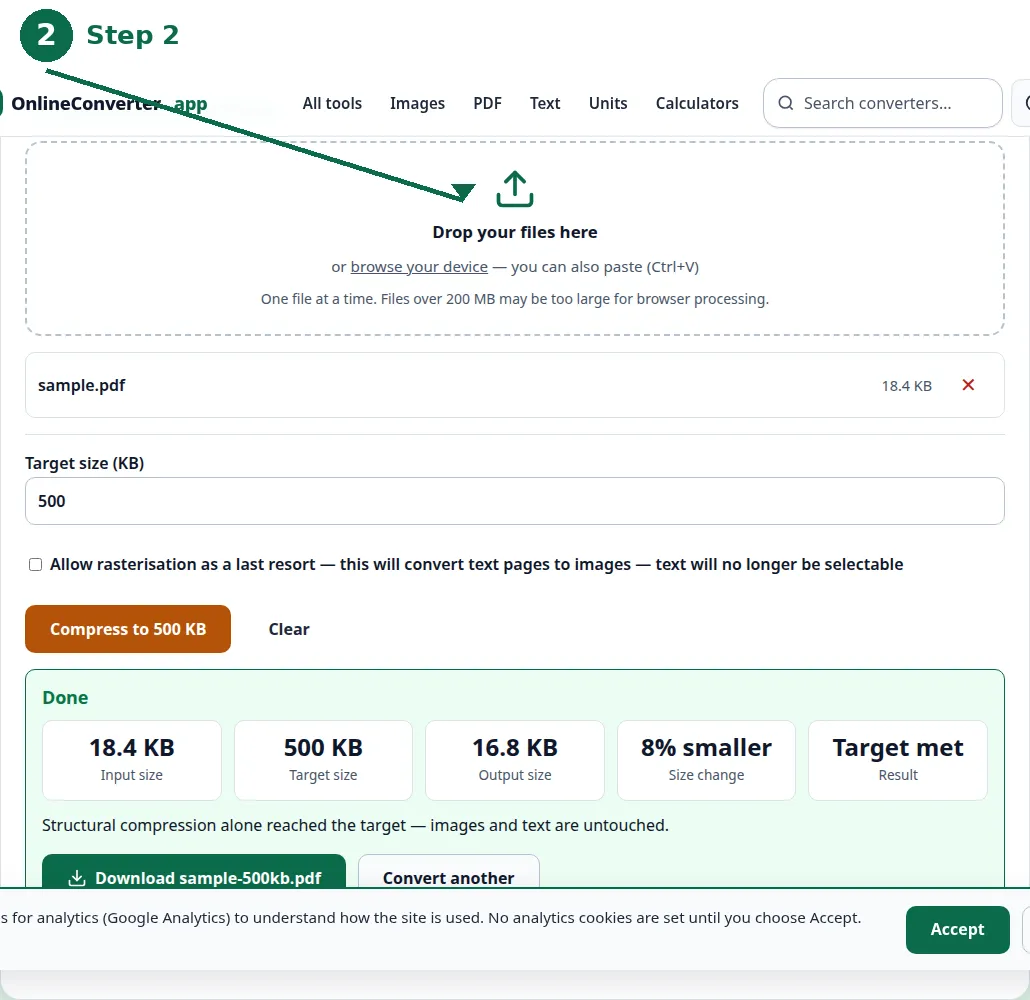
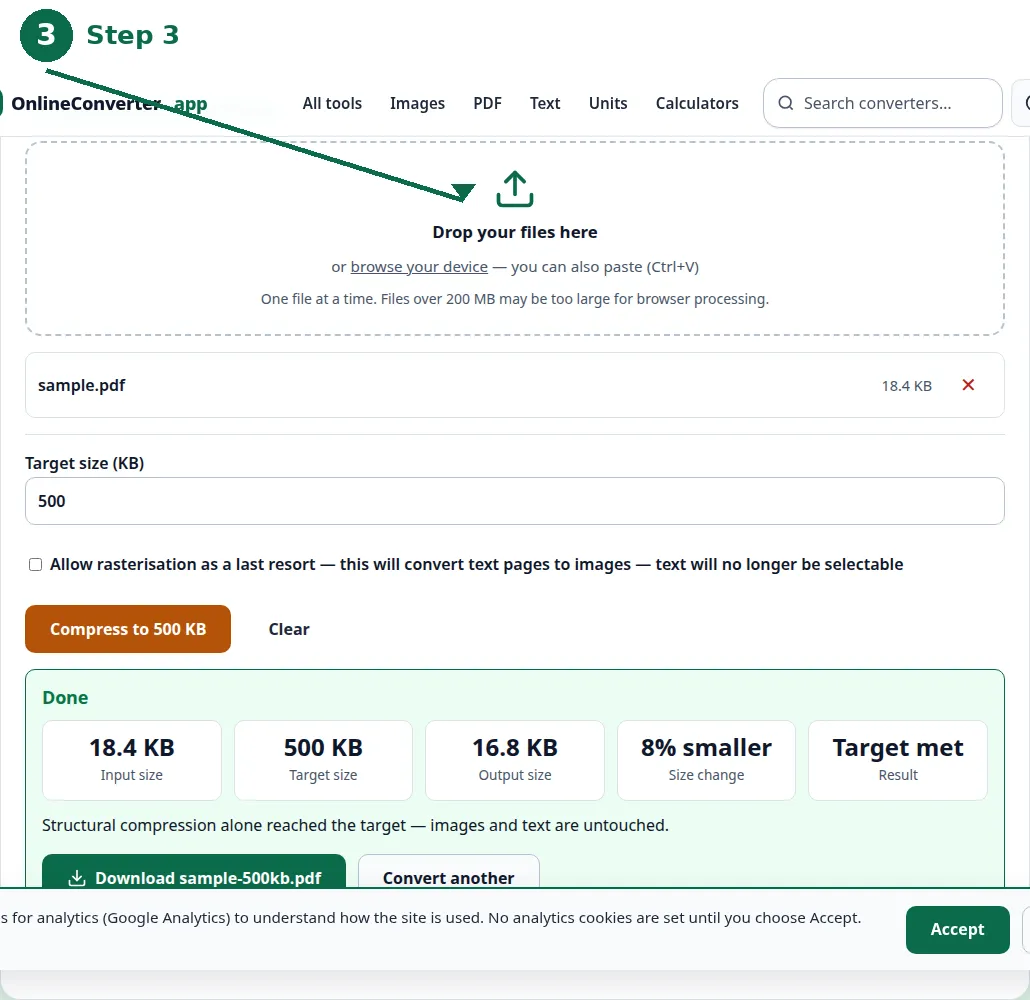
- Step 3 — Click Convert and read the result: the size reached, how much smaller that is, and whether the target was met.
- Step 4 — If the target was missed, read the message: it tells you the closest readable result, and whether to reduce the source or accept it.
Compress a PDF to an exact size
The four levels, and which to try first
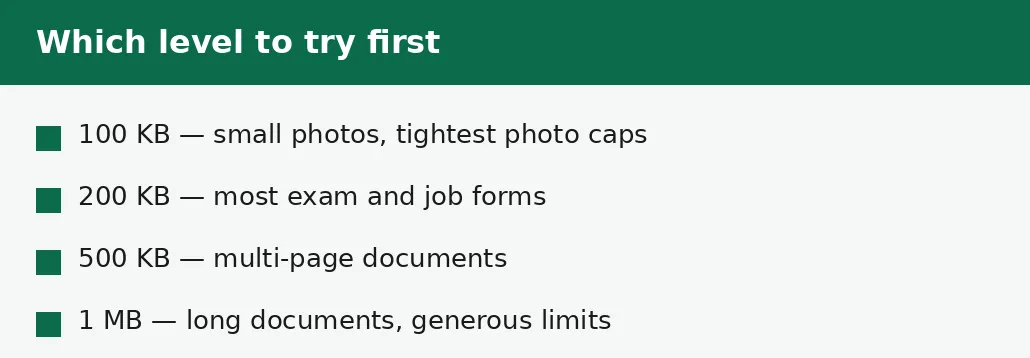
Try the portal's own limit first, always. If the form says 200 KB, compress to 200 KB — do not compress to 100 KB just to be safe, because the extra squeeze costs quality and buys nothing: a file under the limit passes, and a file far under the limit passes no better. The only reason to go below the limit is a small margin of a few kilobytes, in case the portal counts kilobytes slightly differently from the tool.
When the form gives a range rather than a single number — say, 100 KB to 200 KB — aim for the middle of the range, around 150 KB. When it gives only a maximum, aim a touch under it. And when it gives no limit at all, 500 KB is a sensible default for a document: small enough to upload quickly on a slow connection, large enough to stay readable.
| Target | Typical use | Try it first when |
|---|---|---|
| 100 KB | Small photos, tight photo caps | The form caps a photo at 100 KB. |
| 200 KB | Exam and job application forms | The form says 200 KB — the most common limit. |
| 500 KB | Multi-page documents | The form caps a document at 500 KB. |
| 1 MB | Long documents, generous limits | The form allows up to 1 MB, or gives no limit. |
What happens when the target cannot be reached
Some files cannot reach a small target and stay readable, and the tool says so honestly instead of pretending. You will see a message giving the closest readable result — for example, that a file cannot reach 100 KB and stay readable, with the closest readable size beside it. A file that is mostly photographs, or a long scan at high resolution, has a floor below which it turns to mush, and no honest tool can cross that floor.
When that happens you have three real options. First, accept the closest readable result and check whether the portal allows a larger size for that particular document — some forms cap photos tightly but allow larger documents, and the limit you are fighting may be the wrong one. Second, reduce the source before you compress: a scan taken at a lower resolution starts smaller and compresses further. Third, allow the last compression step — turning pages into images — if you have not already, and accept that the text will no longer be selectable.
Choosing between levels when the form is vague
A form that only says small file or under 1 MB is not giving you a target, and the honest answer is to pick the level that fits the document. A one-page certificate compresses comfortably to 200 KB; a ten-page scanned report will not, and should be aimed at 500 KB or 1 MB. The number of pages and the amount of photography in the file decide what is realistic, not your patience.
If you must guess, guess once and check the result before uploading: compress, read the size reached, and look at the pages. If the text is still crisp and the photos still recognisable, the level was right. If the pages look soft, step up one level — 100 KB to 200 KB, or 200 KB to 500 KB — and compress again from the original file, never from the already-compressed one.
Photos and documents are different jobs
If the file you need under a limit is a photo rather than a PDF, do not put it in a PDF first. Use the image compressor, which shrinks the photo while keeping its format, or the exact-target image page when the portal wants a photo at a precise size. A photo saved as a PDF is a picture wrapped in a document, and compressing the wrapper is the long way round.
Documents, by contrast, compress best as PDFs: the tool rebuilds the file's internal structure first, which does not touch the pages at all, and only then recompresses the embedded pictures. That order matters — a file saved wastefully can lose a surprising amount of size in the first step alone, with no visible change at all.
Troubleshooting
Why can't my file reach 100 KB?
A file that is mostly photographs, or a long scan at high resolution, has a floor below which it turns to mush. The tool reports the closest readable result instead of pretending — accept it, check whether the portal allows a larger size for that document, or reduce the source before you compress.
Why is my result a few kilobytes under the target?
That is the safe side of the limit: a result of 198 KB passes everywhere a 200 KB result does, and it passes even on a portal that counts kilobytes a little differently from the tool. Aim a touch under the limit, not exactly on it.
Why did compressing twice make it worse?
Compressing an already-compressed file starts from the degraded copy, so each pass loses more detail for less size. Always compress again from the original file, never from the compressed result.
Common questions
Which size should I try first?
The size on your form. 200 KB is the most common limit; 100 KB for tight photo caps, 500 KB and 1 MB for documents. If the form gives no limit, 500 KB is a sensible default for a document.
What if my file can't reach the target?
The tool says so honestly and gives you the closest readable result, with the number adapted to your file. Accept it, check whether the portal allows a larger size for that document, or reduce the source before you compress.
Will compression change how my PDF looks?
The first step does not touch the pages at all. The second step recompresses the embedded pictures, which can soften photos slightly. The third step, which turns pages into images, only runs if you allow it — and then the text is no longer selectable.
Is my file uploaded anywhere?
No. Compression runs entirely in your browser. Nothing is sent to a server, there is no account, and closing the tab clears your file from memory.
What is the difference between the exact-target pages and the general compressor?
The exact-target pages are built around one size — 200 KB, 500 KB and the rest — for the shortest path to a common limit. The general Compress PDF tool takes any target size in kilobytes and carries the table of verified portal limits. Same three steps, same honest result reporting, same browser-only processing.
Should I compress a photo as a PDF?
No. Compress the photo itself with the image compressor, and upload the picture in the format the form asks for. A photo saved as a PDF is a picture wrapped in a document, and compressing the wrapper is the long way round.
Summary
Pick the limit on your form — 100 KB, 200 KB, 500 KB or 1 MB — and compress toward exactly that number with the general compressor or the exact-target page for that size. Read the result before you upload, aim a touch under the limit, and if the target cannot be reached and stay readable, take the closest readable result or reduce the source. Photos go through the image compressor, not through a PDF.